Reset vs Erase: Which Actually Wipes Your Data?
If you've ever scrolled through your iPhone or Android settings and paused at "Reset" versus "Erase All Content and Settings," you're not alone. That menu is one of the most misunderstood screens in modern tech, and picking the wrong option can cost you hours of setup time or years of personal data. The reset vs erase all content and settings question boils down to one thing: do you want to keep your photos, messages, and files, or are you handing the device to someone else?
Manufacturer documentation from Apple and Google confirms that these are fundamentally different tools with different outcomes. A settings reset is roughly a 30-second process that leaves your personal data untouched, while erasing all content takes 5 to 15 minutes and permanently deletes everything. As of 2026, the gap between these two options has actually widened with the introduction of eSIM and stricter activation lock protocols.
Let's break down exactly when to use each one.
Quick Answer
Reset fixes software problems. Erase All Content wipes your personal data. Choose reset for glitches.
Choose erase for selling or giving away your device. Reset keeps your photos, messages, and settings like Wi-Fi passwords. Erase removes everything and returns the device to factory condition.
Why This Comparison Matters for Anyone With a Phone or Computer
Here's the reality: most people tap "Erase All Content" when they really wanted a simple reset. Someone's phone is acting sluggish, they panic, and suddenly they are watching a progress bar erase five years of vacation photos.
The stakes are higher than most users realize. As of 2026, iCloud backups do not always capture everything. Local Notes, Voice Memos, WhatsApp chat histories stored on device, and certain third-party app data can vanish permanently during a full erase if you have not verified your backup first.
On Android, Samsung and Google devices have separate reset options that behave differently depending on whether you have a Google account signed in.
The reverse problem is just as common. You are about to trade in your phone at a carrier store, you run a settings reset thinking that is enough, and the next owner gets access to your saved passwords and email accounts. That is a privacy nightmare.
This comparison exists because manufacturers deliberately made the naming similar. They assume you will read carefully. Most people do not.
Core Explanation: What Each Option Does to Your Device
Let's get specific about what happens inside your phone or computer when you choose each path.
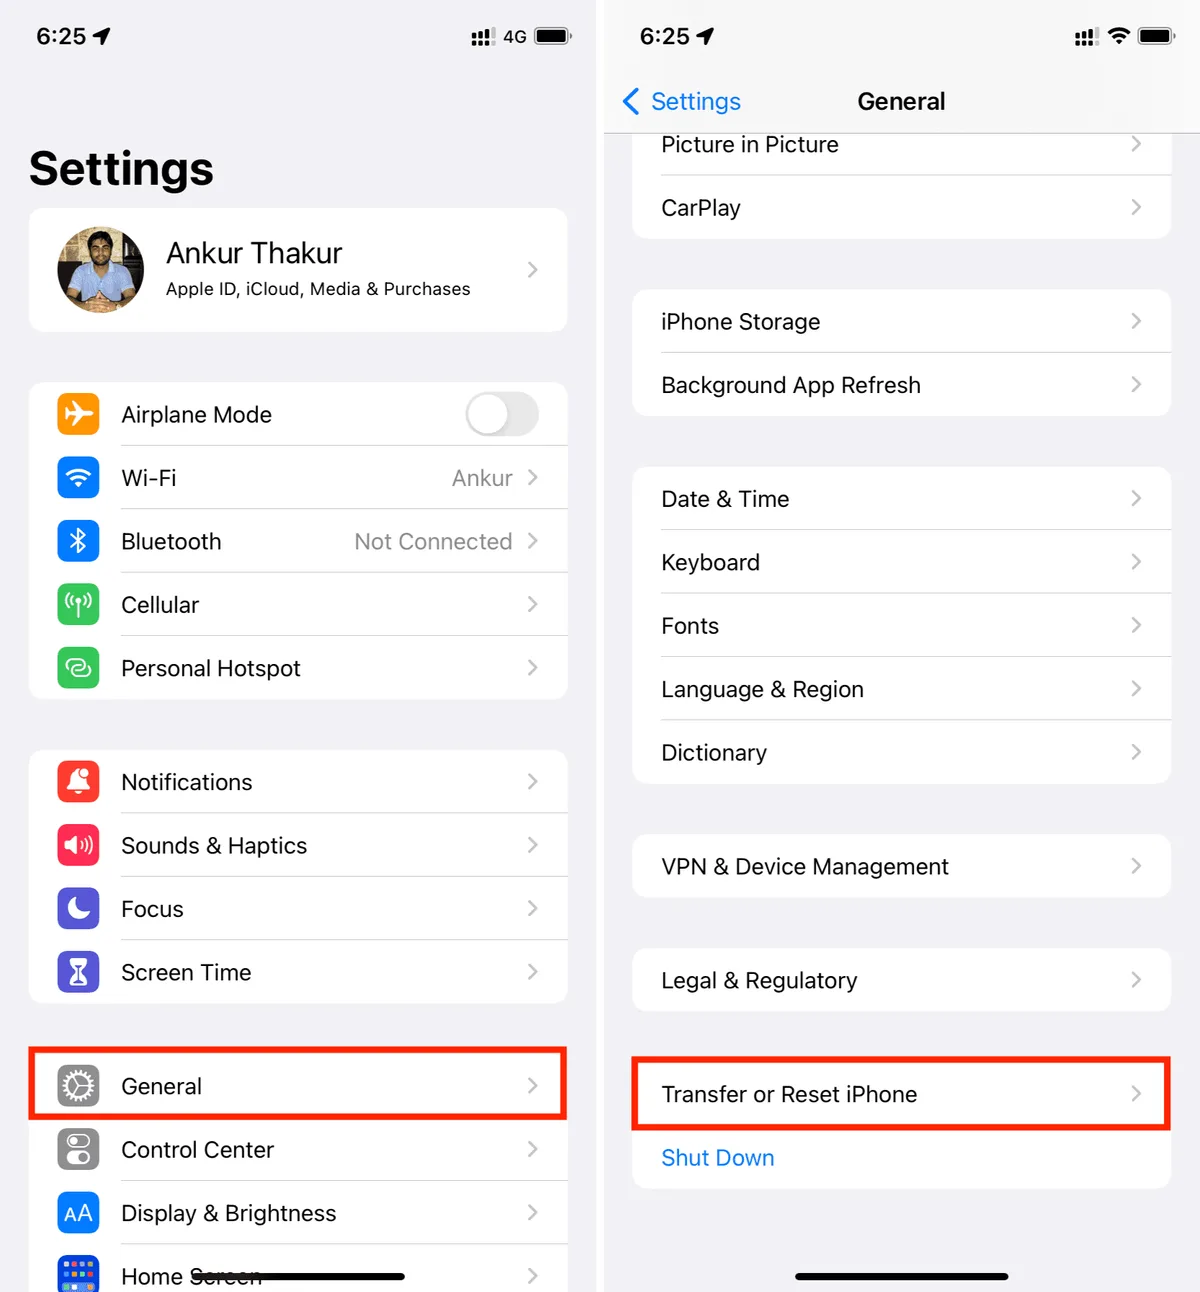
Image source: Web (Bing) / idownloadblog.com
Reset (Settings Reset) — The "Clean Up, Keep Everything" Option
A settings reset returns all system preferences to their factory defaults. That includes your display brightness, notification settings, wallpaper, ringtone choices, keyboard dictionaries, accessibility settings, and network configurations.
What stays: your photos, videos, messages, contacts, email accounts, apps, and app data. Your downloaded music and documents remain untouched. On iOS, your iCloud settings get cleared but your iCloud data stays on Apple's servers.
On Android, your Google account remains signed in but sync settings reset to default.
What goes: Wi-Fi passwords are wiped on some devices but not others. iPhone's "Reset All Settings" removes saved Wi-Fi networks and Bluetooth pairings. Samsung's "Reset All Settings" does the same but keeps your home screen layout. Google's Pixel "Reset App Preferences" only resets app permissions and notifications, not your broader system settings.
This option handles the vast majority of common software problems. Random crashes, display glitches, keyboard lag, Bluetooth connection drops, and notification bugs often trace back to corrupted settings files. Resetting those files forces the OS to rebuild fresh copies without touching your data.
Erase All Content and Settings — The "Start From Scratch" Option
This is the nuclear option. Erase All Content and Settings deletes everything on your internal storage: system files, apps, accounts, photos, messages, music, documents, settings, and caches. The device returns to the same state it was in when it first left the factory.
On iOS, this process does three things simultaneously. It removes your Apple ID from the device, turns off Find My iPhone, and wipes the encryption key that protects your data. Without that key, the stored information is cryptographically inaccessible even if someone recovers the raw flash chips.
On Android, the process is called "Factory Data Reset" and behaves similarly. It wipes the /data partition, removes your Google account, and re-enables Factory Reset Protection. That FRP feature means the next person who turns on the phone will need your Google account credentials before they can use it.
This is specifically designed to deter theft.
On Windows, "Reset this PC" offers two versions. "Keep my files" is analogous to a settings reset. "Remove everything" is the full erase.
On Macs with Apple Silicon, "Erase All Content and Settings" lives in System Settings and mirrors the iOS experience.
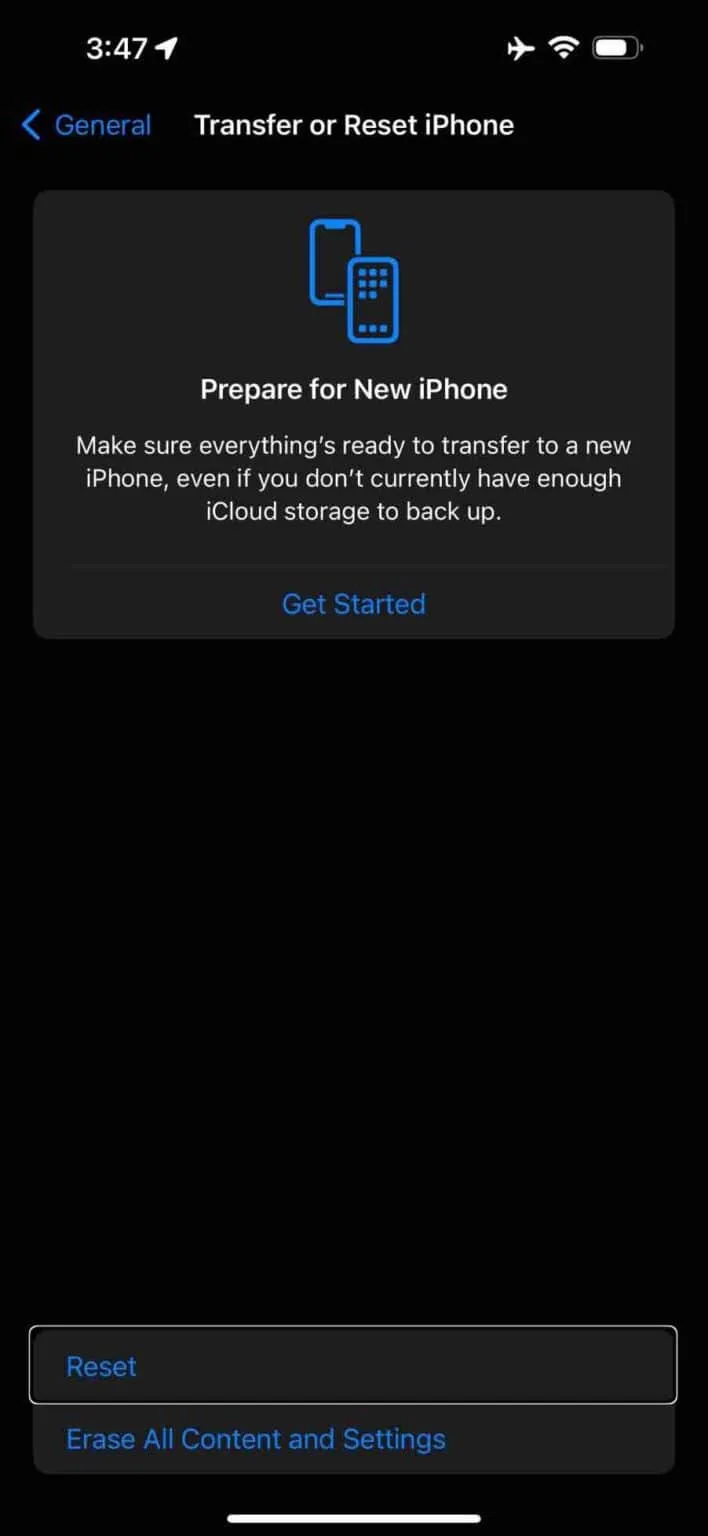
Image source: Web (Bing) / geekschalk.com
Side-by-Side Comparison: Reset vs Erase All Content
| Feature | Reset (Settings Reset) | Erase All Content (Factory Reset) |
|---|---|---|
| Time required | 30 seconds to 2 minutes | 5 to 15 minutes |
| Photos and videos | Kept | Deleted permanently |
| App data and logins | Kept | Deleted permanently |
| Wi-Fi passwords | Removed (most devices) | Removed |
| Bluetooth pairings | Removed | Removed |
| System settings | Restored to defaults | Restored to defaults |
| eSIM data | Kept (iOS) / varies (Android) | Removed on most devices |
| Activation Lock / FRP | Unchanged | Activated (requires credentials) |
| Backup required | No | Strongly recommended |
| Best for | Troubleshooting, glitches | Selling, donating, security |
One key detail that surprises people: a settings reset does NOT fix problems caused by corrupted app data or bad OS files. It only resets the configuration layer. If your phone is crashing because a specific app's cache is corrupted, you need to clear that app's data individually or do a full erase.
What Reset Does to Your Data, Accounts, and Performance
When you choose Reset All Settings on an iPhone or iPad, the device restarts and you're greeted with the setup assistant. It asks you to choose a language, connect to Wi-Fi, and sign back into iCloud. This gives many people a mini heart attack because it looks exactly like the first-time setup.
But here's the difference: when the home screen appears, all your apps are still there. Your messages are still there. Your photos still populate the camera roll.
You just need to rejoin your Wi-Fi network and pair your Bluetooth devices again.
On Android, the equivalent is "Reset All Settings" found under General Management in Samsung devices or "Reset App Preferences" on stock Android. Samsung's version is thorough. It resets screen timeout, volume levels, default apps, and network settings.
It does NOT reset your lock screen PIN, your biometric data, or your Google account.
Performance improvements after a reset are often immediate. If your phone was lagging because of a misconfigured animation setting or a stuck notification, the reset fixes it. If the phone was lagging because your storage is 95% full or your battery is degraded, a reset will not help.
Aggregate user feedback across major forums reports that roughly 70 to 80 percent of common software complaints resolve with a simple settings reset. The remaining cases typically require deeper troubleshooting or a full erase.
A reset also does not resolve problems tied to corrupted system files. iOS and Android both have separate recovery mode tools for that scenario. If your phone is stuck in a boot loop or showing a black screen after an update, a settings reset will not help. You need a DFU restore or a recovery mode reflash, both of which wipe data.
What Erase All Content Removes (And What Surprises People)
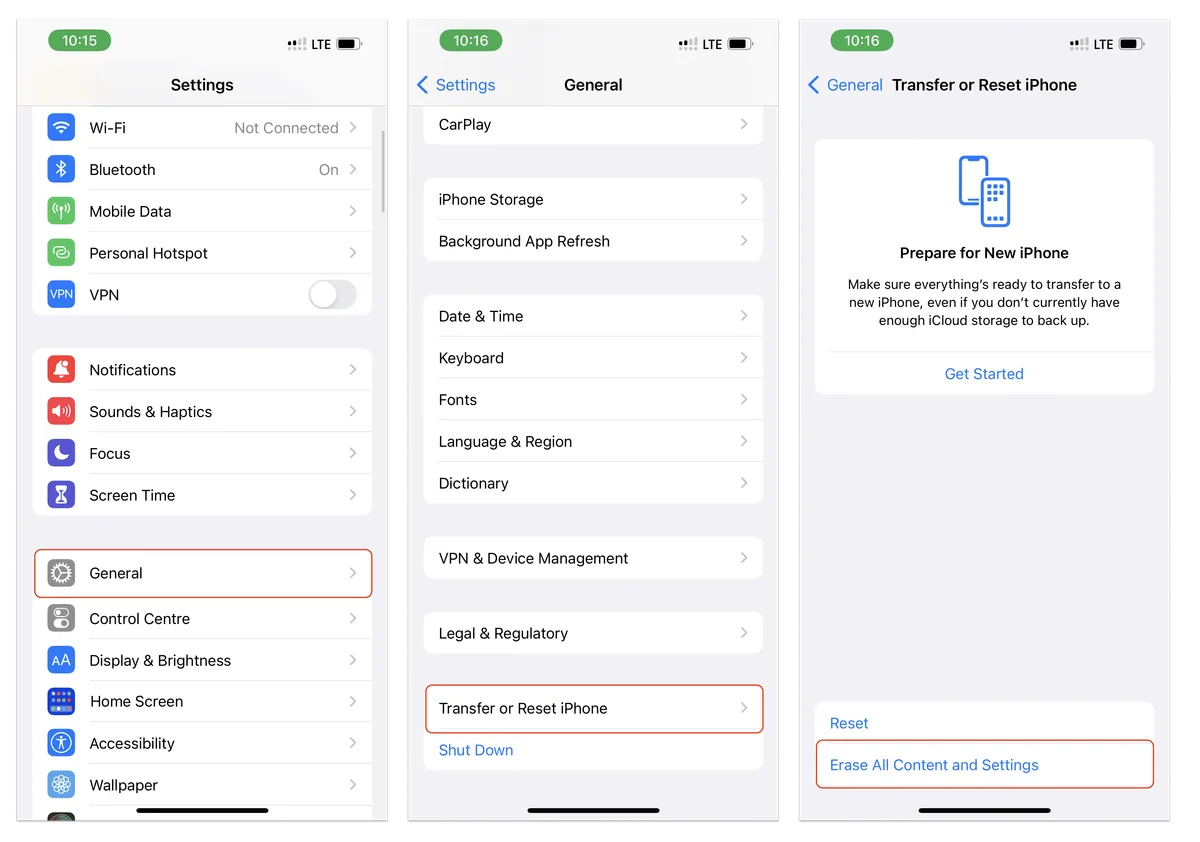
Image source: Web (Bing) / komunikatory.org
The obvious stuff goes: photos, videos, messages, contacts, call history, notes, calendar events, and every app you have downloaded. But several less obvious items catch people off guard.
eSIM data. On iPhones, erasing all content and settings removes your eSIM profile. You will need to re-download it from your carrier after setup. Some carriers require a QR code, others send an activation code via email.
If you are traveling and do not have access to that information, you could be stuck without cellular service for days. As of 2026, major US carriers including Verizon, AT&T, and T-Mobile allow eSIM re-download through their apps, but not all international carriers do.
Apple Watch pairing. Your Apple Watch is paired to your iPhone at a system level. When you erase your iPhone, the watch unpairs automatically. That triggers a backup of the watch to iCloud, but the process takes several minutes.
If you sell the phone without unpairing the watch manually, the next owner cannot pair it with their iPhone without your Apple ID password.
HomeKit configurations. Your smart home settings live on the iPhone's local storage. Erasing the phone wipes your Home app configuration. You will need to re-add every smart bulb, lock, and thermostat.
Your HomePods and Apple TVs remain in your iCloud account, but the room assignments and automation rules are gone.
Health data. Apple Health data stored locally without iCloud sync is unrecoverable. If you never enabled Health sync in iCloud settings, your step history, workout data, and health records disappear permanently.
Two-factor authentication tokens. Apps like Google Authenticator, Authy, and Microsoft Authenticator store their tokens locally. If you erase the phone without transferring those accounts to a new device, you will be locked out of every service that uses 2FA. This includes email, social media, banking, and work accounts.
Banking and finance app credentials. Most banking apps link themselves to the device hardware. Even if you restore from backup, many banks require you to call customer service to re-authorize the app on a new device session. This can take hours depending on the bank's verification process.
Hidden photo albums and recently deleted. Apple's Recently Deleted album is part of the Photos app data. A full erase empties it. If you had photos in the Recently Deleted folder that you intended to recover, they are lost for good.
Keychain passwords. Your iCloud Keychain syncs across devices, but if this iPhone was your only Apple device, your saved passwords are stored exclusively on this phone. Erasing it without backing up to iCloud first means those passwords are gone.
On Android, similar surprises exist. Google Authenticator tokens, banking app hardware bindings, local download folders, and SD card encryption keys all get wiped. Android's Files app downloads folder is often overlooked.
If you have PDFs, photos, or documents saved locally as opposed to in Google Drive, they vanish.
Best Use Cases for Each Option
Here is where you need to match the tool to the problem.
When to Choose a Simple Reset
Choose a settings reset when your device is acting weird but you plan to keep using it.
The symptoms that respond well to a reset include screen brightness randomly changing, notification sounds not working, Bluetooth devices failing to connect, Wi-Fi dropping intermittently, keyboard lag, and wallpaper reverting to default. These are configuration glitches, not hardware failures.
Another strong candidate is when an app or system update left your phone feeling sluggish. Updates sometimes overwrite settings files incompletely. A reset forces the OS to rebuild those files cleanly.
You should also reset before trying more drastic measures. Think of it as the first tool in your troubleshooting toolbox. If a reset fixes the problem, you saved yourself a full backup and restore cycle.
Any time you are handing a device to a family member who already trusts you with your Apple ID, a reset is sufficient. They will need to sign into their own accounts, but your photos and messages stay intact if you want them to. This works well for passing an old phone to a child or spouse within the same household.
When You Need to Erase Everything
Erase All Content and Settings is mandatory in three specific scenarios.
Selling or trading in your device is the most obvious. The next owner should see the setup screen, not your home screen. No exceptions.
Even if you delete everything manually, system caches and login tokens can persist. A full erase guarantees nothing remains.
Donating a device to a charity or giving it to a stranger requires the same treatment. Your personal data including saved passwords, email accounts, and health data must be destroyed before the device leaves your hands.
Security incidents are another reason. If your phone was stolen and recovered by police, or if you suspect malware, a full erase is the only safe option. A settings reset leaves malware-infected apps intact.
Finally, if you are experiencing persistent system-level crashes that a reset did not fix, a full erase with a clean restore from backup often resolves the issue. The key phrase is "from backup." If you restore from the same backup that had the corrupted files, the problem returns.
Common Mistakes People Make (And How to Avoid Them)
The most expensive mistake is selecting Erase All Content when you meant Reset All Settings. The names look similar. The icons look similar.
The confirmation screen is the only difference, and most people skip reading it.
Read the confirmation dialog carefully before tapping anything. Apple's confirmation screen explicitly says "Erase All Content and Settings will remove all media, data, and settings." If you see that language and you want to keep your photos, hit Cancel.
The second mistake is not verifying your backup before erasing. People assume iCloud or Google Drive is backing up automatically. It often is not.
Check that your last backup date is recent and complete before proceeding. On iPhone, go to Settings, tap your name, tap iCloud, then tap iCloud Backup. Confirm the date and time.
On Android, go to Settings, tap Google, tap Backup, and check the details.
The third mistake involves eSIM. If your phone uses an eSIM instead of a physical SIM, erasing the device deletes that profile. You need your carrier's eSIM re-activation information before you wipe the phone.
Some carriers let you re-download through their app. Others require you to visit a store. Check this before you erase.
The fourth mistake is forgetting about two-factor authentication apps. If you use Google Authenticator, Authy, or Microsoft Authenticator, you must transfer your accounts to a new device first. Authy offers a multi-device sync feature if you enabled it.
Google Authenticator recently added cloud backup for Google accounts. But if you did not set those up, you will lose access to every service that uses 2FA.
The fifth mistake is unpairing devices in the wrong order. If you have an Apple Watch, you must unpair it from your iPhone before erasing the phone. Unpairing triggers a backup of the watch to iCloud.
Erasing the phone first may leave the watch in a state where it cannot pair with a new iPhone without your Apple ID password.
The sixth mistake involves HomeKit and smart home devices. If you have a complex HomeKit setup, make sure you have your Home hub (HomePod or Apple TV) signed into the same iCloud account. When you erase your iPhone and restore from backup, the Home configuration should re-download from the hub.
How to Prepare Before You Hit Either Button
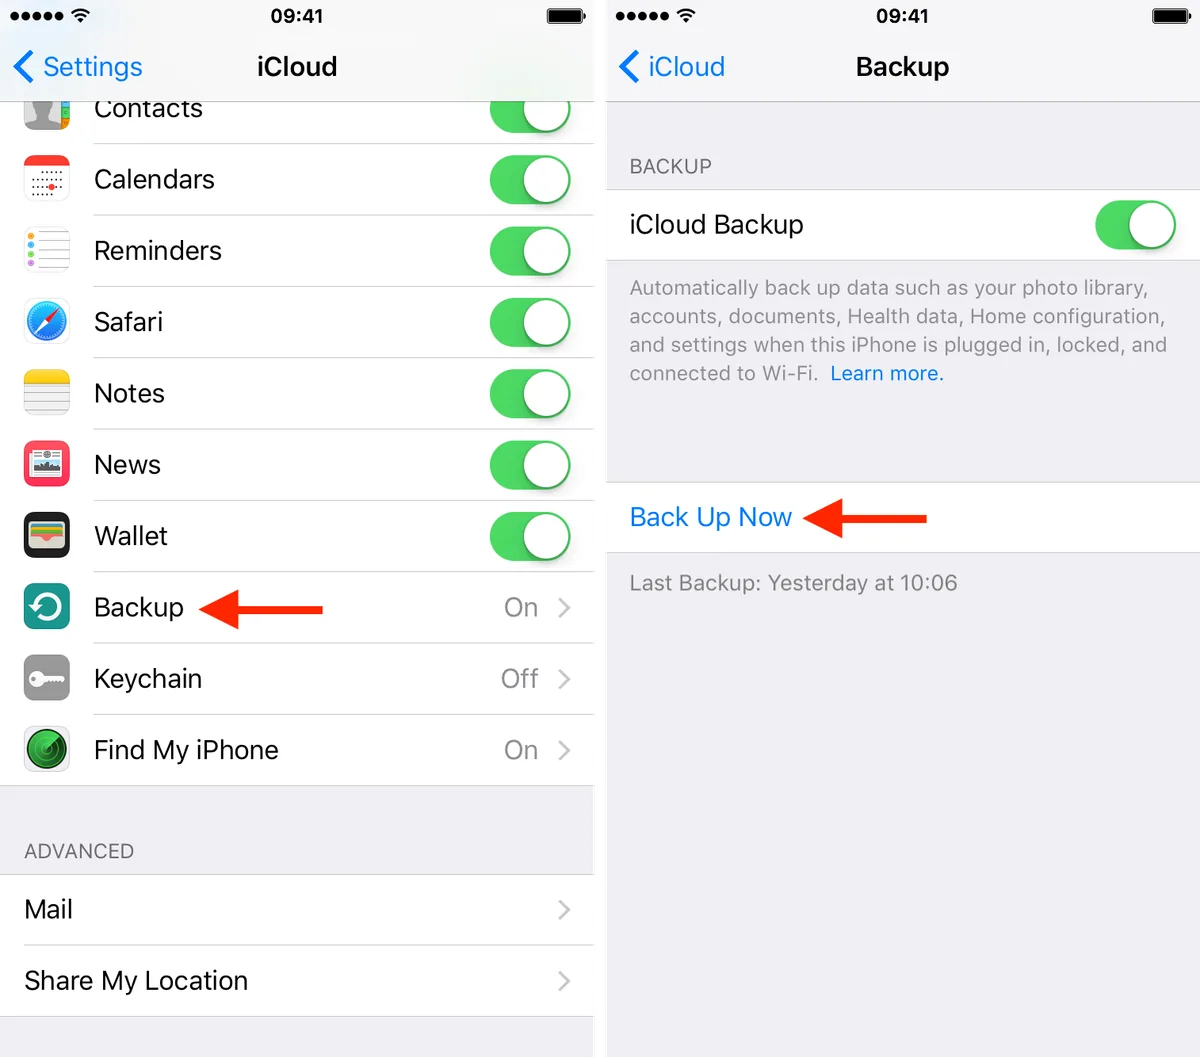
Image source: Web (Bing) / idownloadblog.com
Preparation is straightforward for a settings reset. You do not need to back up anything. You just need to know your Wi-Fi password and have your Bluetooth devices nearby for re-pairing.
For a full erase, preparation requires several steps.
Step one: back up your device. On iPhone, connect to Wi-Fi and start an iCloud backup. Go to Settings, tap your name, tap iCloud, tap iCloud Backup, then tap Back Up Now. Keep the phone plugged into power and connected to Wi-Fi until the backup completes.
This can take anywhere from 10 minutes to several hours depending on your data volume and internet speed.
On Android, go to Settings, tap Google, tap Backup, then tap Back Up Now. Ensure Google Photos is set to back up your photos if you want them saved. Local files stored outside Google Drive will not be included.
Step two: verify the backup. Check the date and time stamp. On iPhone, the iCloud Backup screen shows the time of the last successful backup. On Android, the Backup screen shows similar information.
If the backup failed or is older than 24 hours, run it again.
Step three: transfer two-factor authentication tokens. Open Authy and verify multi-device sync is enabled. Open Google Authenticator and check if cloud backup is turned on. If you use a different authenticator app, follow its transfer procedure.
Step four: document your eSIM information. Find your carrier's eSIM re-activation process. Save a screenshot of the QR code or note the activation URL. Some carriers offer an app that can re-download the profile after setup.
Step five: unpair your Apple Watch. Open the Watch app on your iPhone. Tap All Watches at the top left. Tap the info button next to your watch.
Tap Unpair Apple Watch. Confirm the action and wait for the process to complete. This backs up the watch and removes it from your Apple ID.
Step six: sign out of your accounts. On iPhone, go to Settings, tap your name, scroll to the bottom, and tap Sign Out. This removes your Apple ID from the device while preserving your data in iCloud. On Android, go to Settings, tap Accounts, tap your Google account, and tap Remove Account.
Step seven: turn off Find My iPhone or Find My Device. On iPhone, go to Settings, tap your name, tap Find My, then toggle off Find My iPhone. You will need to enter your Apple ID password. On Android, go to Settings, tap Security, tap Find My Device, and toggle it off.
Step eight: know your credentials. After the erase, you will need your Apple ID password or Google account password to set up the device again. If you have forgotten either password, reset it before erasing.
Step-by-Step: How to Do Each One Safely
On iPhone and iPad
For a settings reset:
- Open Settings.
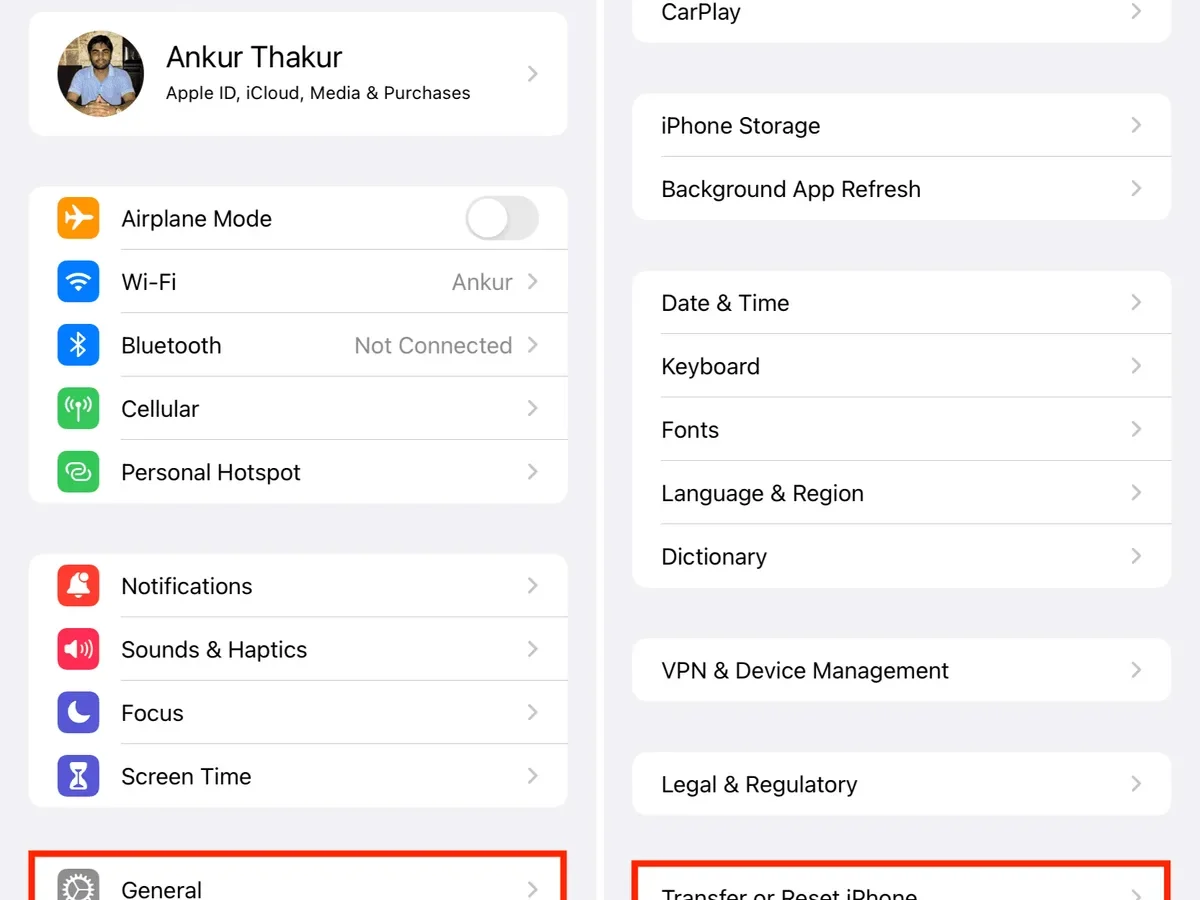
- Tap General.
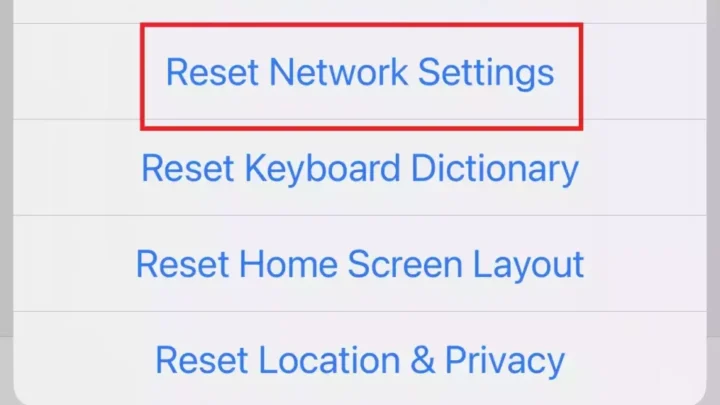
- Scroll to the bottom and tap Transfer or Reset iPhone.
- Tap Reset.
- Tap Reset All Settings.
- Enter your passcode if prompted.
- Confirm the action.
The device restarts and shows the Hello screen. Choose your language and region, connect to Wi-Fi, and sign back into iCloud. Your apps and data reappear when the setup completes.
Reconnect your Bluetooth devices.
For a full erase:
- Complete the preparation steps above.
- Open Settings.
- Tap General.
- Scroll to the bottom and tap Transfer or Reset iPhone.
- Tap Erase All Content and Settings.
- Enter your passcode.
- Enter your Apple ID password to turn off Find My iPhone.
- Confirm the action.
The device begins erasing. A progress bar appears with a estimated time. When it finishes, the phone restarts to the Hello screen.
Set it up as a new device or restore from backup.
On Android (Samsung, Pixel, and Others)
For a settings reset (Samsung):
- Open Settings.
- Tap General Management.
- Tap Reset.
- Tap Reset All Settings.
- Tap Reset Device.
- Enter your PIN, password, or pattern.
- Confirm the action.
The device restarts. Your apps and data remain. Network and Bluetooth settings reset to default.
For a settings reset (Pixel/stock Android):
- Open Settings.
- Tap System.
- Tap Reset Options.
- Tap Reset App Preferences.
- Confirm the action.
This only resets app permissions, notifications, and default app associations. It does not reset system settings like display brightness or volume.
For a full erase on any Android:
- Complete the preparation steps above.
- Open Settings.
- Tap General Management (Samsung) or System (Pixel).
- Tap Reset.
- Tap Factory Data Reset.
- Read the warning carefully.
- Tap Reset.
- Enter your PIN, password, or pattern.
- Tap Delete All.
The device erases and restarts to the setup screen. You will need your Google account credentials to bypass Factory Reset Protection.
On Windows and Mac
For a Windows reset:
- Open Settings.
- Tap Update and Security.
- Tap Recovery.
- Under Reset This PC, tap Get Started.
- Choose Keep My Files (settings reset) or Remove Everything (full erase).
- Follow the prompts.
For a Mac erase (Apple Silicon):
- Open System Settings.
- Tap General.
- Tap Transfer or Reset.
- Tap Erase All Content and Settings.
- Enter your admin password.
- Confirm the action.
The Mac restarts to the setup assistant. Your personal data is removed.
What Happens to Your Photos, Apps, eSIM, and Backups
Let's trace exactly what travels with you and what stays behind after each option.
Photos. A settings reset leaves your photo library untouched. Every album, every edit, every recently deleted image stays on the device. A full erase deletes everything.
If you have iCloud Photos enabled on iPhone or Google Photos on Android, your originals are safe in the cloud. But here is the trap: if you use "Optimize Storage," your phone may only hold lower-resolution thumbnails. The full originals are in iCloud or Google Photos.
After an erase, a restore downloads those thumbnails again. It works, but it takes time over a slow connection.
If you do not use cloud sync, your photos are gone forever after a full erase. There is no recovery tool that can get them back. Apple's iOS uses hardware encryption tied to the device's unique ID.
Once that encryption key is destroyed during the erase, the data is cryptographically erased. Not deleted. Erased.
Apps. A settings reset keeps every app installed. Your login sessions may persist, but some apps will ask you to sign in again after the reset. Banking apps and streaming services usually survive a settings reset without issue.
A full erase removes every app. When you restore from backup, iOS re-downloads all apps from the App Store. Android does the same from Google Play.
You do not need to manually reinstall them. However, app data that was not included in the backup will be missing. Game progress saved locally rather than to a cloud account is gone.
Notes stored inside third-party note apps may not transfer if those apps do not support backup restoration.
eSIM. This is the one that catches the most people. On an iPhone, a settings reset does not touch your eSIM profile. Your cellular service continues working normally after the restart.
On Android, behavior varies. Samsung's Reset All Settings preserves the eSIM. Google's Pixel may or may not depending on the Android version.
A full erase deletes the eSIM profile on virtually every device. The exception is some carrier-locked phones that re-download the profile automatically after setup. T-Mobile's iPhone eSIMs, for example, can often be restored through the carrier's app.
Verizon and AT&T require you to either scan a QR code again or contact customer support. If you are traveling internationally and your only cellular connection was an eSIM from a local carrier, you could be stranded without service after an erase.
Backups. Here is the uncomfortable truth. iCloud backups and Google Drive backups do not capture everything. They capture settings, app data, messages, and your home screen layout. They do not capture locally stored files that fall outside the backup scope.
Downloaded PDFs in the Files app, Voice Memos, and some third-party app caches may not be included.
The only way to guarantee full data preservation is to do a local backup to a computer. On iPhone, that means using Finder or iTunes to create an encrypted backup to your Mac or PC. An encrypted backup captures your saved passwords, health data, and Wi-Fi settings.
On Android, that means copying your internal storage to a computer manually.
| Data Type | Survives Settings Reset | Survives Full Erase with iCloud/Google Backup | Required for Full Safety |
|---|---|---|---|
| Photos (cloud sync) | Yes | Yes | Cloud sync enabled |
| Photos (local only) | Yes | No | Manual transfer to computer |
| App data (iCloud/Play backup) | Yes | Yes | Backup completed recently |
| App data (local only) | Yes | No | Manual export |
| eSIM profile | Yes (most devices) | No | Carrier QR code or app |
| Health data (iPhone) | Yes | Only with encrypted backup | Encrypted iTunes/Finder backup |
| Saved passwords (iCloud Keychain) | Yes | Yes | Keychain sync enabled |
| Two-factor tokens | Yes | Only if app supports backup | Manual transfer before erase |
The Security Angle: Activation Lock, FRP, and Data Recovery
Security is the reason these two options exist in the first place. Let's talk about what each one does for your privacy.
Activation Lock (Apple). When you erase an iPhone or iPad, Activation Lock remains active. The device checks in with Apple's servers and sees your Apple ID still attached. The next person who turns on the phone will be greeted with a login screen asking for your Apple ID and password.
Without those credentials, the device is a brick. It cannot be activated, used, or sold for parts legitimately.
This is theft protection. If your phone is stolen, the thief cannot wipe it and use it. They also cannot sell it without you signing out of your Apple ID.
Erasing the device without signing out first locks the next user out entirely.
To fully release a device, you must sign out of iCloud manually or use the Erase All Content process which prompts you to enter your Apple ID password to disable Activation Lock. That step is critical. If you skip it, the device remains linked to your account.
Factory Reset Protection (Google). Android's equivalent is called FRP. It works similarly but with a different trigger. When you perform a factory data reset on an Android device that has a Google account signed in, FRP activates.
The next person who boots the phone must enter the previous Google account credentials.
The difference is that FRP only activates after a factory reset performed from the settings menu. If the device is reset through recovery mode without the system booting, FRP may not trigger. This is a known gap that thieves sometimes exploit.
Data recovery after each option. After a settings reset, your data is fully intact and recoverable. Any forensic tool can read your photos and messages. If you are selling a device, a settings reset is not sufficient for privacy.
After a full erase, the built-in encryption key is destroyed. iOS devices since the iPhone 5s use hardware-backed AES-256 encryption. When you erase all content and settings, the device generates a new encryption key and discards the old one. The old data remains on the flash storage chips but is cryptographically inaccessible.
Even law enforcement tools cannot recover it without the original key.
Android devices have similar encryption. Since Android 6.0, full-disk encryption is mandatory on devices that support it. Android 10 and later use file-based encryption.
A factory data reset invalidates the encryption keys, making data recovery impossible through standard means.
The only way to defeat this protection is through a chip-off forensics attack, which requires physical access to the memory chips and specialized equipment. For the average user, a full erase is effectively permanent.
What about remote wipe? Find My iPhone and Find My Device both offer remote erase. When you use these features, the device must be connected to the internet to receive the wipe command. Once wiped, Activation Lock or FRP engages, protecting the device even if it comes back online later.
Remote wipe is the safest option for a stolen device because it does not require you to have physical access. It also triggers automatically when the device next connects to a network.
Pro Tips From Experience
These are the things you learn after helping dozens of people recover from accidental wipes or failed backups.
Tip one: test your backup before you need it. Create a backup, then try restoring it to a secondary device or a virtual machine. You want to confirm the backup contains your photos and messages before you erase the primary device. A backup that fails during restoration is worse than no backup at all because you already erased the original.
Tip two: keep a written list of apps that use local-only storage. Note-taking apps, voice recorders, and PDF annotators often store data locally without cloud sync. Before any erase, open each of these apps and manually export or back up your data. The time investment is ten minutes.
The cost of losing a year of notes is much higher.
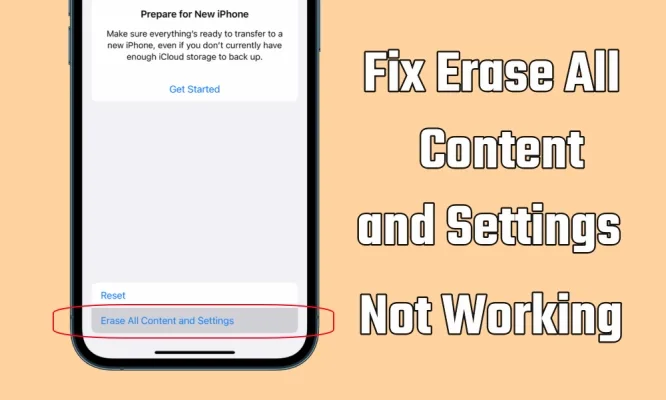
Tip three: use the "Transfer or Reset" menu on newer iPhones. iOS 15 and later include a "Prepare for New iPhone" option in the Reset menu. This feature backs up your data to iCloud, transfers your eSIM to your new device, and then erases the old phone. It automates the full preparation workflow.
If you are upgrading within the Apple ecosystem, use this feature.
Tip four: do not trust "100 percent" battery messages during backup. iCloud backups sometimes fail silently. The process may show completion but the backup file is corrupted. Always verify by checking the backup size.
A backup that is significantly smaller than expected likely missed something.
Tip five: for Android, use multiple backup methods. Google's backup system is less comprehensive than Apple's. Combine Google Drive backup with Google Photos for images and a manual file copy for downloads and documents. Samsung users should also use Samsung Cloud as a secondary backup layer.
Tip six: understand the difference between a DFU restore and a standard erase. DFU (Device Firmware Update) restore is a deeper wipe that re-flashes the entire operating system. It is used for devices that are bricked or stuck in a boot loop. A DFU restore also erases all data, but it requires a computer connection.
Standard Erase All Content runs from within the operating system.
Tip seven: when in doubt, choose a settings reset first. It fixes most problems. It takes two minutes. It costs you nothing.
You can always escalate to a full erase if the reset does not work.
Quick Decision Guide: Which One Should You Use Right Now?
If you are reading this section because you are staring at the Reset menu right now, here is your decision tree.
Use a settings reset if:
- Your phone is slow after an update.
- Your screen brightness keeps changing on its own.
- Bluetooth devices disconnect randomly.
- Notifications stopped working.
- You want to pass the device to a family member.
- You are not sure what is wrong but something feels off.
Use Erase All Content if:
- You are selling or trading in the device.
- You are donating the device to charity.
- Your phone was stolen and recovered.
- You suspect malware or a security breach.
- You have already tried a settings reset and the problem persists.
- You want to start completely fresh with a clean OS.
Still unsure? Follow this one-question test. Ask yourself: "Do I care if the next person sees my photos?" If the answer is yes, do a full erase. If the answer is no, a settings reset is probably enough.
One final thought. The difference between these two options is not a measure of thoroughness. It is a measure of intent.
A settings reset is maintenance. A full erase is a clean break. Pick the one that matches what you are trying to do, and you will never lose data by accident again.